Espresso University – Dial-in Light Roasted Coffee
So first things first. What is the Flair PRO 2 and why is it a great tool for dialing espresso at home? In reality, it comes down to three factors: construction, control and price. First and foremost, the Flair PRO 2 is an all-manual lever espresso press that is capable of cafe-quality espresso extractions. The construction of the Flair is robust, featuring aluminum and stainless steel, especially in the brewing chamber, which ensures that home baristas can reach the needed 6-9 BAR of pressure to ensure a well-balanced extraction.
Second, and because the Flair PRO 2 is completely manual, every aspect of the brewing process is under the control of the barista. There are very few espresso machines on the market that allow their users to immediately see and modify their pressure, extraction times and dialing-in process. The Flair PRO 2 comes standard with Flair’s custom pressure gauge, with a targeted espresso zone, that provides instant feedback on what’s going on inside the puck while brewing. This allows for various and advanced pressure profiling like never before.
Finally, the price. Sure there are some espresso machines on the market that allow similar feedback and quality. But these typically cost many hundreds, and often many thousands, of dollars. The Flair PRO 2 can be yours for roughly $300 dollars, making it a steal when compared to the competition.

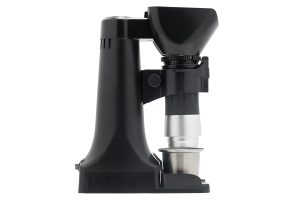
Flair PRO 2 Manual Espresso Maker
The Flair PRO 2 is the best in manual espresso that still comes in a portable package. Brew anywhere and get café-quality espresso all while benefitting from the immediate feedback and control of a manual system.
So, back to dialing-in light roasted coffees. First, we should start by defining a lightly roasted coffee. When Lance refers to a lightly roasted coffee, he considers these to be light brown in color and much more difficult to break with your fingers. For the most part, lightly roasted coffees are more dense and more difficult to grind and extract. In general, this is because more lightly roasted coffees are less soluble. Because lightly roasted coffees are less soluble than their darker roasted counterparts, it means the barista has to manipulate their variables to push the extraction as much as possible!
So, how do we get the flavor out of these more lightly roasted beans? The answer, according to Lance’s experience, is a few things:
- First we are going to grind a bit more finely than with darker roasted coffees.
- Then we are going to preheat the chamber more intensely than we would with a darker roasted coffee.
- And finally, Lance recommends using brew water that is just off the boil, as he needs to ensure the temperatures are as high as possible for these coffees!
To begin this dial-in process on the Flair PRO 2, Lance recommends starting with 16 or 16.5 grams of coffee. In this video, he’s starting off using his Niche Zero grinder set to a 24. So if you’re lucky enough to have one, that’s a great place to start. You may notice that the 24 setting on the Niche Zero is more coarse than the typical recommended grind size for espresso on other machines. You may have heard us say that light roasts require a very fine grind size, so this might be confusing.
Allow us to explain. Yes, light roasted coffee requires a more fine grind size when compared to darker roasted coffee. But, the Flair PRO 2 brewing system uses a portafilter basket with a smaller diameter – 46.5mm – as compared to a standard commercial 58 mm basket. So, as compared to an espresso extracted at a coffee shop, the puck on the Flair PRO 2 is more narrow and deeper, which necessitates a slightly more coarse grind to ensure saturation, contact time and appropriate extraction.
For lighter roasted coffees, Lance prefers to start with a three part extraction:
- Pre-Infusion – at roughly 3 BAR for 10-12 seconds
- Spike/Ramp – moving quickly from the pre-infusion pressure to ramp up, or spike, at roughly 8-9 BAR for 10-12 seconds
- Flow-rate Control – slowly reduce the pressure in the chamber as you maintain the original flow rate of your shot until you’ve reached your desired output
But, as you’ll see in the linked video, Lance typically likes to let his coffee dictate how the extraction will go. And this is where the Flair really shines. Listen to the feedback the Flair espresso maker gives when pulling your first shot, and then make any modifications as necessary.
So, let’s take a look at the three espressos Lance pulled on the Flair PRO 2 before he found his sweet spot:
Shot #1 – 16 grams in and 30 grams out in 60 seconds. This shot was very sour, which indicated a need to extend the ratio – or get more output for your input. With lighter roasted coffees, a shorter ratio (less than 2:1) may mean a sour coffee, so the second shot will require a more coarse grind and a higher flow rate earlier on to ensure the sweetness is extracted from the beans.
Shot #2 – So for the second shot, Lance went four clicks more coarse on his Niche, to grind setting 28. He was still using a 16 gram dose, and decided to increase his output to 40 grams out in 55 seconds. This shot was still a bit on the sour side, and Lance decided that he wanted to elongate, or increase, his brew ratio even more, closer to 3:1.
But, before completing this it’s important to address any fears about utilizing a 3:1 ratio in your recipe. Fear not all you doubters! These lightly roasted coffees have lots and lots to give.
Shot #3 – Finally espresso nirvana. The look on Lance’s face says it all! This extraction was the same 16 gram dose, at the same grind setting. But, to elongate here, Lance allowed the extraction to flow for an additional five seconds, getting very close to one minute. This yielded 45 grams in his cup, and a delicious shot of espresso with lots of fruit.
Before we finish, we wanted to also provide some pro tips for espresso brewing before closing up this chapter of Espresso University. These are below.
- PRO Tip #1 – When dialing in and repacking your portafilter, make sure that you wipe the inside of the basket before extracting. Water beads make channels!
- PRO Tip #2 – Something else that needs to be addressed when extracting espresso: Time doesn’t matter as much as taste!
- PRO Tip #3 – Use a WDT tool to help distribute your grinds evenly before tamping. These can be homemade or purchased, and work wonders in terms of reducing channeling.
So there you have it, a step by step guide to dial-in light roasted coffees using the Flair PRO 2 manual espresso maker. We sincerely hope that you enjoy these Espresso University videos, and we can’t wait until the next installment.
If you’re thinking about buying a Flair PRO 2, you can learn more about this brewing machine, and make your purchase, here!