Espresso University – The Basics of Espresso
What is Espresso
So, what is espresso? As Martina explains it, espresso is both a drink and a brewing method. Those big machines you see at coffee shops and cafes all around the world specialize in this brewing method, which is characterized by forcing heated water at high pressures, through a bed of finely ground coffee in a short period of time. This process creates a coffee drink known as espresso, which is small in volume and highly concentrated.
The espresso brewing method is completely different from other coffee brewing methods, like pour over or drip coffee for example, and the texture and mouthfeel of the espresso drink that comes from it will be completely different.
But, it’s important to note that regardless of the brewing method, any coffee beans can be used! There are no beans that are specific only to espresso. Any coffee bean, from light to dark roast, can be used in espresso, and bags of coffee that say they are an “espresso blend” simply mean that the roaster recommends these beans for the espresso brewing method!
This should open up a world of coffee to everyone, and Martina recommends that new home brewers try out different coffees and pick the ones they like best.
Grinding for Espresso
So, now that we’ve chosen our coffee, we need to grind it for espresso. Martina says that grind quality and consistency is the number one priority in brewing delicious espresso. But that it’s also the most easily overlooked topic by beginning espresso brewers. Everyone wants a nice espresso machine and tends to put the grinder lower down on the priority list. But this shouldn’t be the case!
Now, grinding for espresso means that the grounds will be very fine, and that a small fluctuation or change in the grind size or consistency will have a significant impact on the taste of your espresso. This is why Martina recommends getting a grinder with micro-adjustments, or one that is stepless, so that it’s easy for the home brewer to dial-in their grind just as they like it.
Why the Flair is Great for Espresso at Home?
As Martina says, the Flair is a manual machine, and home brewers have access to all the variables of the extraction, which allows them to create an amazing espresso just the way they like it. In addition to this, the Flair is a great learning tool. Changing one variable at a time like tamping, brew pressure, grind size or water temperature, can allow the brewer to understand how that change impacts the taste of the espresso in their cup. This type of control is difficult to find in an electric espresso machine, unless you can spend in the thousands of dollars.
Finally, the Flair is totally portable, and doesn’t require electricity, so you can handcraft espresso anywhere you are and take your coffee with you.

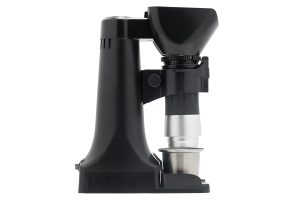
Flair PRO 2 Manual Espresso Maker
The Flair PRO 2 is the best in manual espresso that still comes in a portable package. Brew anywhere and get café-quality espresso all while benefitting from the immediate feedback and control of a manual system.
So, now that we understand what espresso is, let’s assemble the Flair and go through its parts to get a better understanding of how it works. In the video, Martina is using a Flair PRO 2, which home brewers can pick in one of three colors: black, chrome or white.The first step is to assemble the Flair’s two major components, the base and the lever, which features the portafilter base. These two items can be affixed with a screw if you’re not traveling for a while and want a little more stability. But every Flair works perfectly without this screw.
Then, Martina introduces us all to the Brew Head, which as she says, “Is where the magic happens.”
The PRO 2 brew head comes with a few different parts: like the bottomless portafilter where we put our coffee, the dispersion screen that goes on top of it, and the brewing cylinder which holds the brew water. Inside the brew cylinder is the stainless steel plunger. The stem and Flair’s custom pressure gauge connect to this plunger to lower it during extractions and create the pressure needed for espresso.
All in all, it’s a pretty simple machine, being just a lever! But Flair didn’t stop there, and has provided a range of accessories, which are also beautiful, to make brewing easier! A branded stainless steel drip tray shines in the light while keeping your counter clean, and a stainless steel tamper, dosing cup, funnel, preheat cap and a removable spout are all featured to ensure you get the best brewing experience.
As with every manual espresso machine, the first step is to preheat the parts to ensure the temperature of the water stays high enough for the brew. Martina says you can do this by using the included preheat cap for the cylinder, or the home brewer can use any type of funnel to position the cylinder and portafilter on top of the kettle they’re using to heat the water. This option is faster and more efficient.
While the brew cylinder is preheating the coffee beans can be prepared, making sure that we grind for espresso as discussed previously! And Martina cannot emphasize how important getting a set of brewing scales is, as it will make measuring much easier and more precise. As Martina has mentioned, every small change in espresso variables will change the taste of the espresso in your cup, so a scale will aid in managing these variables like extraction time and output!
In the video, Martina has found that for this coffee 17 grams is a great dose size, so that’s what she decides to grind. The grind setting you’ll need will be different for each coffee, and you’ll have to tweek it daily for the same coffee. You can’t just dial in once and “set it and forget it!”
Once the portafilter is nice and warm, Martina adds the grounds to the portafilter using the dosing funnel. She then uses what’s called a WDT or a Weiss Distribution Technique tool that makes sure the grounds are uniform throughout the basket, with no air bubbles or areas where the coffee can get more or less compacted. This ensures an even extraction.
Then Martina brings in the handy stainless steel tamper, made specifically for the Flair PRO 2. She tamps those fluffy grounds into a beautiful cake, making sure to tamp as level as possible. She then puts the dispersion screen on top, and sets the portafilter into the base.
Once the water is ready and the cylinder is hot to the touch, Martina places it on top of the portafilter and fills it up with the water, just above the plunger so there’s no air gap inside. She then places the scale and an espresso cup below the portafilter, sets the scale to zero and begins to lower the lever!
As Martina mentions in the video, here is where you can get creative. As you pull down the lever, as long as you have your grind dialed in, you’ll start to see the gauge register some pressure. You can play around with this variable, performing pre infusions, ramps, and tapers. This is the part of espresso brewing that’s called flow control, and is a feature usually only found in machines priced at least 10 times more than the Flair!
Martina begins slowly pulling down until she sees the pressure gauge going to 2 or 3 BAR of pressure, then she maintains this position until a few drops start coming out of the portafilter. Then she slowly and steadily increases the force on the lever until the gauge reaches the espresso range! Here Martina stays, until she reaches her desired output measured by her scale. Doing this, the extraction should take about 40 to 50 seconds, which is a little bit longer than regular electric espresso machines.
For this particular coffee and the 17 grams used Martina says she likes to extract 40 grams of espresso yield. This is a ratio of 1:2.3, which is measured by comparing input weight to output weight. Home brewers should change this ratio based on the coffee and roast type they’re using. But, for a medium roast, this is a good starting point for novice brewers.
What is Crema?
And now that the shot has been pulled, we can see on top of the espresso this golden brown foam named crema. Baristas and home brewers can get very fixated on crema because it looks beautiful and is very appetizing to the eye (and the mouth). But what exactly is this crema?
Martina explains that the process of roasting coffee creates CO2 that is trapped in the coffee beans. When the coffee is freshly roasted it has lots of CO2 inside. During brewing, the highly pressurised water becomes supersaturated with the CO2 – as it extracts – and then will begin to release it. These tiny bubbles make a smooth foam that we call crema. The pressure is the key here, this is why we don’t get crema in other brewing methods like pour overs.
Now, fresher beans and a higher roast level will yield more crema. And a darker roast will usually result in darker crema. At the correct pressure for espresso, and with fresh enough beans, crema will be present. But we don’t have to take the amount or the colour of the crema as an indicator of the quality of the shot.
For example a light roast will be more pale in color and have less crema. But if dialed in right, this light roast will still be amazing in taste!
And that’s it! A basic introduction to espresso by Martina Vigo of Flat & White.